
|
|
Day 1: Lighted Black Cat BannerWelcome back to the Fifth Annual 60 Days of Halloween! That's right! This year marks five years of Halloween hijinks! Our plan is to make 2016 bigger than ever! That means cooler crafts, tastier recipes, snarkier commentary, and more glue gun accidents than ever before!So let's get to it! Today's idea comes courtesy of Country Living. Since I'm obsessed with cats, it only makes sense to start there this year. So behold: a very festive lighted black cat banner!  It's our first craft of the year, and it wasn't a total disaster! Go us! And a very snazzy close-up! 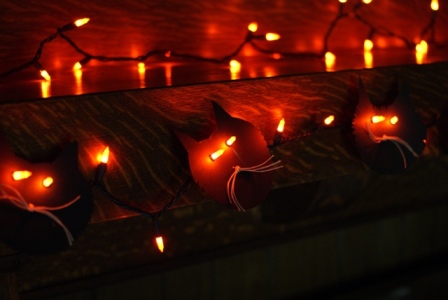 Our low-light lens makes everything look cooler. And here's how you do it! As always, directions included in the captions!  Supply shot! You'll need card stock, twine, pencil, scissors, hole punch, glue gun, and a box of lights. Please ignore the tape. It sneaked into the picture unnoticed. Rascally tape!  First, cut out a template of a cat head. You can use the one with the original directions at Country Living. We made our own. Look how smugly proud I am of my cat head. You'd think I never used a pair of scissors before...  Then using your template, cut out your cat heads. You can also fringe the edges to make them look like they have real fur. We originally cut out eight cat heads, but we only used six. That means we now have two disembodied cat heads floating around the house. Is it Halloween or what?  Next, punch holes for eyes. Also, as you can see, I sort of cheated, and cut out the twine first, which means that the next pictures are basically lies. 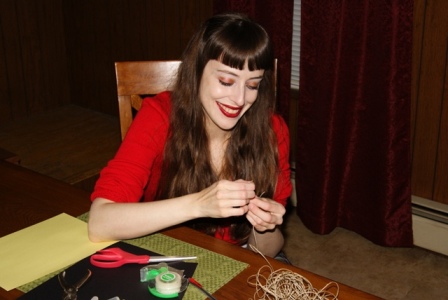 Using your roll of twine, cut out three pieces of 4-inch twine per cat face. Smile to yourself because you know you're doing this step first, and therefore fooling all the people reading your blog into believing this is the fourth step.  Tie the twine in the center. That knot will serve as the little cat nose!  Employ your glue gun to secure the tied pieces of twine. Also, be sure to use the glue gun to burn yourself at least once. Red, peeling flesh is festive after all!  And here it is: the first 2016 accident of 60 Days of Halloween! I should tell you that I'm screaming in pain, but that's actually laughter. With a few tears thrown in for good measure.  As the last step, use the eye holes and push the lights through. Please note that the lights we used got a little hot, so probably don't leave this craft plugged in when you're not around. We don't want any serious Halloween accidents. Glue gun burns are one thing; house fires are another...  And one last parting shot of today's craft! Hooray for 2016 Halloween! And that's it for today! Join us tomorrow for Day 2 of Halloween revelry! |